
Leider beinhaltet Avalonia selbst kein PropertyGrid. Eine kleine, eigene Implementierung ist aber zum Glück auch nicht so aufwändig wie es zunächst klingt. In meinem OpenSource-Projekt MessageCommunicator [1] bin ich genau diesen Weg gegangen. Die umgesetzten Funktionen sind zwar stark von den Anforderungen von MessageCommunicator getrieben, sie sollten aber in Bezug auf das PropertyGrid allgemeingültig verwendbar sein. Elemente wie TextBoxen für String-Properties, Eingabevalidierung und Gruppen-Überschriften werden schließlich auch von anderen Applikationen benötigt. Gerne kann meine Implementierung des PropertyGrid auch als Vorlage für andere Projekte oder ggf. einem eigenen OpenSource-Projekt speziell für das PropertyGrid vergleichbar zu PropertyTools [2] dienen.
Inhaltsverzeichnis
Beispiel MessageCommunicator
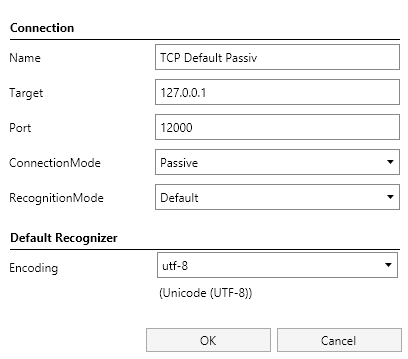
In der Gui des MessageCommunicators können verschiedene Verbindungsprofile angelegt werden, jedes davon kann mit anderen Verbindungsmodi (=ByteStreamHandler) und anderen Logiken zur Nachrichtenerkennung (=MessageRecognizer) konfiguriert werden. Von den Datenklassen her existiert je Verbindungsmodus und Nachrichtenerkennung jeweils eine eigene Klasse mit jeweils auch anderen Eigenschaften. Eine solche Struktur des Codings ist wie geschaffen für PropertyGrids, da sie hier dem Entwickler den Aufwand abnimmt, je Daten-Klasse individuelle Oberflächen zu bauen. Nachfolgender Screenshot zeigt, was an der Oberfläche dabei rausgekommen ist. Die Eigenschaften im Hintergrund sind dabei von den Typen Strings, UInt32 und Encoding.
Umsetzung
Bei der Umsetzung des PropertyGrids habe ich mich grob an das PropertyGrid von PropertyTools angelehnt. Ähnlich wie bei PropertyTools existiert auch bei meiner Implementierung eine Factory-Klasse für die generierten Controls je Eigenschaft (PropertyGridEditControlFactory). Diese ist dafür zuständig, anhand der vorher gesammelten Informationen zu einer Eigenschaft das entsprechende Control zu erzeugen. Der komplette Quellcode des PropertyGrids ist unter [3] zu finden.
Im Xaml existiert eine sehr einfache Grundstruktur (siehe folgender Codeausschnitt). Die eigentliche Magie kommt erst im Codebehind bzw. im ViewModel dazu.
<UserControl xmlns="https://github.com/avaloniaui"
             xmlns:x="http://schemas.microsoft.com/winfx/2006/xaml"
             xmlns:d="http://schemas.microsoft.com/expression/blend/2008"
             xmlns:mc="http://schemas.openxmlformats.org/markup-compatibility/2006"
             xmlns:local="using:MessageCommunicator.TestGui"
             mc:Ignorable="d"
             x:Class="MessageCommunicator.TestGui.PropertyGrid"
             d:DesignHeight="300"
             d:DesignWidth="400">

    <UserControl.Styles>
        <Style Selector="TextBlock">
            <Setter Property="Margin" Value="4" />
            <Setter Property="VerticalAlignment" Value="Center" />
        </Style>
        <Style Selector="ComboBox">
            <Setter Property="Margin" Value="2" />
            <Setter Property="Padding" Value="0" />
            <Setter Property="VerticalAlignment" Value="Center" />
        </Style>
        <Style Selector="TextBox">
            <Setter Property="Margin" Value="2" />
            <Setter Property="VerticalAlignment" Value="Center" />
        </Style>
    </UserControl.Styles>

    <ScrollViewer>
        <Grid x:Name="GridMain">
            <Grid.ColumnDefinitions>
                <ColumnDefinition Width="150" />
                <ColumnDefinition Width="*" />
            </Grid.ColumnDefinitions>
        </Grid>
    </ScrollViewer>
</UserControl>
Das Codebehind sammelt alle notwendigen Informationen aus den Eigenschaften des ausgewählten Objekts. Wie im nächsten Codeausschnitt zu sehen existiert dort irgendwo eine Schleife über alle Eigenschaften. Innerhalb dieser Schleife bzw. im Konstruktor der Klasse ConfigurablePropertyMetadata werden alle für das PropertyGrid relevanten Informationen gesammelt.
foreach (var actProperty in selectedObject.GetType().GetProperties())
{
    // Check browsable attribute
    var browseAttrib = actProperty.GetCustomAttribute<BrowsableAttribute>();

    if (browseAttrib != null &&
       !browseAttrib.Browsable)
    {
        continue;
    }

    newPropertyMetadata.Add(new ConfigurablePropertyMetadata(actProperty, selectedObject));
}
Im nächsten Codeausschnitt ist das Herzstück des Konstruktors der ConfigurablePropertyMetadata Klasse zu sehen. Hier werden alle verfügbaren Informationen ausgewertet und für das PropertyGrid aufbereitet. Die Attribute EncodingWebNameAttribute und TextAndHexadeciumalEditAttribute sind welche, die speziell im MessageCommunicator notwendig sind.
var propertyType = _propertyInfo.PropertyType;
if (_propertyInfo.GetCustomAttribute<EncodingWebNameAttribute>() != null)
{
    this.ValueType = PropertyValueType.EncodingWebName;
}
else if (_propertyInfo.GetCustomAttribute<TextAndHexadecimalEditAttribute>() != null)
{
    this.ValueType = PropertyValueType.TextAndHexadecimalEdit;
}
else if (propertyType == typeof(bool))
{
    this.ValueType = PropertyValueType.Bool;
}
else if (propertyType == typeof(string) || propertyType == typeof(char) ||
        propertyType == typeof(double) || propertyType == typeof(float) || propertyType == typeof(decimal) ||
        propertyType == typeof(int) || propertyType == typeof(uint) ||
        propertyType == typeof(byte) ||
        propertyType == typeof(short) || propertyType == typeof(ushort) ||
        propertyType == typeof(long) || propertyType == typeof(ulong))
{
    this.ValueType = PropertyValueType.String;
}
else if (propertyType.IsSubclassOf(typeof(Enum)))
{
    this.ValueType = PropertyValueType.Enum;
}
else if(propertyInfo.GetCustomAttribute<DetailSettingsAttribute>() != null)
{
    this.ValueType = PropertyValueType.DetailSettings;
}
else
{
    throw new ApplicationException($"Unsupported property type {propertyType.FullName}!");
}
Der nächste Codeausschnitt ist aus der Klasse PropertyGridEditControlFactory. Hier wird je Eigenschaft ein Control für die UI generiert. Der Input dafür ist jeweils das vorher erzeugte ConfigurablePropertyMetadata Objekt.
public class PropertyGridEditControlFactory
{
    public virtual Control? CreateControl(
        ConfigurablePropertyMetadata property,
        IEnumerable<ConfigurablePropertyMetadata> allProperties)
    {
        Control? ctrlValueEdit = null;
        switch (property.ValueType)
        {
            case PropertyValueType.Bool:
                ctrlValueEdit = this.CreateCheckBoxControl(property, allProperties);
                break;

            case PropertyValueType.String:
                ctrlValueEdit = this.CreateTextBoxControl(property, allProperties);
                break;

            case PropertyValueType.Enum:
                ctrlValueEdit = this.CreateEnumControl(property, allProperties);
                break;

            case PropertyValueType.EncodingWebName:
                ctrlValueEdit = this.CreateEncodingWebNameControl(property, allProperties);
                break;

            case PropertyValueType.TextAndHexadecimalEdit:
                ctrlValueEdit = this.CreateTextAndHexadecimalEditControl(property, allProperties);
                break;

            case PropertyValueType.DetailSettings:
                break;

            default:
                throw new ArgumentOutOfRangeException($"Unsupported value {property.ValueType}");
        }
        return ctrlValueEdit;
    }

    //...
}
Im Codebehind des PropertyGrids selbst wird das Grid aus dem Xaml oben lediglich um eine Zeile pro Eigenschaft erweitert. In Summe also nichts Aufwändiges und in einem Anwendungsfall wie hier im MessageCommunicator sehr praktisch.
Verweise
- Testtool für TCP/IP Kommunikation basierend auf Avalonia
https://github.com/RolandKoenig/MessageCommunicator - Repository des Projekts PropertyTools auf GitHub.
https://github.com/PropertyTools/PropertyTools - Die Implementierung des PropertyGrid im Projekt MessageCommunicator
https://github.com/RolandKoenig/MessageCommunicator/tree/master/src/MessageCommunicator.TestGui/_Util/_View/_PropertyGrid
Ebenfalls interessant
- Allgemeiner Artikel zu Avalonia als Cross-Plattform-UI-Framework
https://www.rolandk.de/wp-posts/2020/07/cross-platform-gui-mit-c-und-avalonia/ - Custom Window Chrome mit Avalonia
https://www.rolandk.de/wp-posts/2021/05/custom-window-chrome-mit-avalonia/ - Markdown-Dokumente mit Avalonia rendern
https://www.rolandk.de/wp-posts/2021/08/markdown-dokumente-mit-avalonia-rendern/ - Das DataGrid von Avalonia
https://www.rolandk.de/wp-posts/2022/10/das-datagrid-von-avalonia/ - Schulungen zu Avalonia UI
https://www.rolandk.de/wp-pages/training/